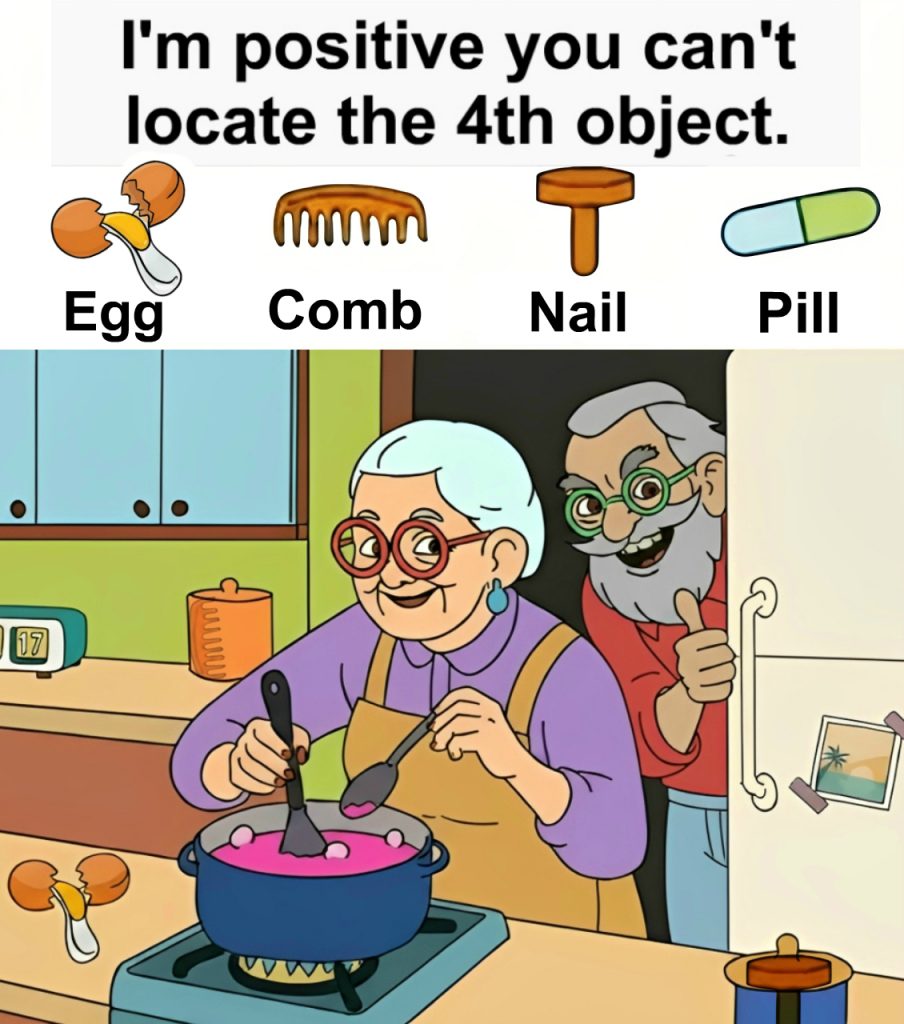
Stare at the kitchen scene for a few seconds. Grandma is stirring a bright pink soup, Grandpa is peeking from the doorway with a grin, and the stove is bubbling away. Somewhere inside this cozy picture, four tiny objects are hiding in plain sight: an egg, a comb, a nail, and a pill. Think you can find all four before you scroll? Time yourself, zoom in if you like, and tell me your best time in the comments. Ready—go!
Why This Puzzle Hooks Your Brain
Hidden-object puzzles are sneaky. Your brain wants to recognize the story (grandma cooking while grandpa watches) and ignore the tiny inconsistencies that don’t fit the narrative. That’s because of two mental shortcuts:
- Top-down processing: We see what we expect to see—pots, spoons, cabinets—so we gloss over unusual textures and shapes.
- Visual crowding: When many details sit close together, small edges blur into the background. Designers of these puzzles place clues near busy areas (handles, labels, edges) so your attention slides right past them.
If you didn’t spot everything in the first pass, don’t worry. You’re normal—and you’re about to get sharper.
Common Mistakes Most People Make
Before we solve it together, here are the most frequent wrong turns:
- Chasing color first. The pink soup, bright cabinets, and bold glasses pull your eyes away from low-contrast clues.
- Trusting “obvious” shapes. A circle near the stove? Must be a knob. A line by the photo? Just part of the frame… right? Not always.
- Ignoring edges. The trickiest items often hug borders—cabinet edges, lid handles, photo corners—where your eye doesn’t linger.
- Rushing the scan. People skim left to right like reading text. But the best strategy is to sweep by layer: background, midground, foreground.
Now, let’s slow down and solve this, step by step.
Video : I Bet You Can’t Find the 4th Object 😱
Step-by-Step Guide: From Background to Foreground
Step 1: Sweep the background (walls, cabinets, fridge).
Scan the cabinet doors—nothing odd. Slide your gaze to the fridge door. There’s a small postcard/photo stuck with a magnet. Look at its lower edge. See that tiny metallic shape that doesn’t belong to a printed postcard? It’s slim, pointed, and sits like it’s piercing the card rather than printed on it. Keep this in mind; we’ll confirm it in the answers.
Step 2: Check the midground (counter, utensils, containers).
Move left to the counter behind Grandma’s elbow. There’s an orange container behind the pot. At first glance, it looks like a measuring jug. Look closer at the darker pattern along its side: the teeth-like silhouette is not just shading—it’s the hint of something with evenly spaced tines. Don’t lock the answer yet, but mentally tag “comb-like pattern on the back container.”
Step 3: Inspect the action zone (stove and pot).
Now focus on the stovetop. It’s busy: blue pot, bubbling pink broth, and knobs. Many players glance only at the pot’s contents (those little white “dumplings”), but the real clue sits on the surface of the stove, where designers love to hide organic shapes that mimic appliance parts. Look for a smooth oval with a distinct yolk-like center embedded into the stovetop art.
Step 4: Scan accessories (spice jar, handles, lids).
In the foreground right corner sits a spice jar with a domed lid and a little knob. Observe the knob’s top: do you notice a tiny capsule silhouette—two halves with a seam? That shape is too rounded and split to be wood grain.
Feeling confident? Time to verify each item.
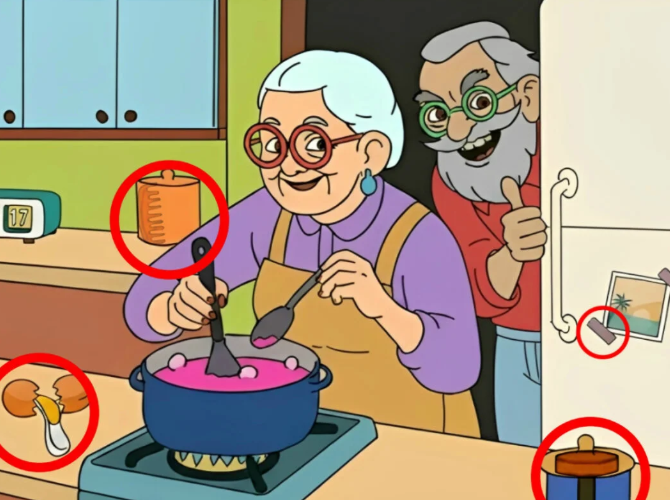
The Official Solution (With Micro-Clues You Can Check)
- Egg — on the stovetop.
Don’t get distracted by the pot. The egg shape is cleverly blended into the stove’s surface design near the burner area—a white oval with a small “yolk” mark. Because our brain labels everything on a stove as hardware, we fail to treat it like a free-floating object. That’s the trap. - Comb — on the pot behind.
Behind the main blue pot, look at the back container (often read as a measuring cup). Along its side is a darkened, toothy silhouette that forms the outline of a comb tucked into the visual noise of printed marks. The tines run vertically, mimicking measuring lines so you gloss over them. - Nail — hidden on the spice jar.
Near the lower right, the spice jar (with a warm, wooden-looking top) conceals the metallic form of a nail in its design accents. The slim, pointed shaft and head are stylized into the jar’s highlight/trim. Because the jar already has vertical highlights, the nail’s line hides in plain sight. - Pill — in the postcard/photo on the fridge.
On the fridge, check the small photo with the beach scene. The tiny oval with a bisecting line—shaped exactly like a pill—is drawn into the corner details of the picture/magnet area. Your brain wants to label it as a reflection or print artifact. It isn’t; it’s the pill.
Why These Hiding Spots Fool You
- Context camouflage: Each item is disguised as something a kitchen already has—knobs, markings, reflections, highlights.
- Competing focal points: Bold colors (the soup, the cabinets, the clothing) soak up your attention, so low-contrast shapes slip by.
- Edge bias: Designers tuck clues along borders (lid knobs, photo corners, container sides) because you skim past edges to chase faces and hands.
A Simple Method You Can Reuse for Any Hidden-Object Image
- Zoom out, then in. Get the overall story, then scrutinize textures, seams, and highlights.
- Scan by layers: back → middle → front. It prevents “favorite-spot” tunneling on the most colorful area.
- Hunt for outliers: perfectly straight lines in organic zones, or perfect ovals in mechanical zones.
- Question textures: wood grain that looks like a capsule? Measurement marks that look like teeth? Re-classify it.
- Cross-check symmetry: If one side shows a feature the other lacks (e.g., one sweaty face vs. a dry one in a sunny scene), that asymmetry is a clue.
Join the Hunt: Tell Us Your Time and Your First Guess
How long did it take you to find all four—Egg, Comb, Nail, Pill? Which one stumped you the most? Be honest: did the pill in the photo trick you, or did the comb on the back pot keep hiding in those “measurement lines”?
Drop your time and your first wrong guess in the comments. Then challenge a friend: share the image and see who beats your record. Hidden-object races make for surprisingly competitive group chats!
Video : Find the 4th Object to Prove You Have Ninja-Focus
Keep Training Your Logic (and Your Patience)
If you enjoyed this kitchen mystery, keep going. The more you practice, the better you’ll get at catching subtle inconsistencies, spotting patterns, and slowing your attention just enough to outsmart the puzzle designer. That same skill sharpens real-life tasks—proofreading, debugging, even reading people’s body language.
Want more? Ask for a fresh set of hidden-object hunts or a timed “spot-the-difference” challenge. I’ll bring the mind games; you bring the eagle eyes.
Now it’s your turn—find Egg, Comb, Nail, Pill, post your time, and tag someone who claims they never miss a detail. Let’s see who the real kitchen detective is.