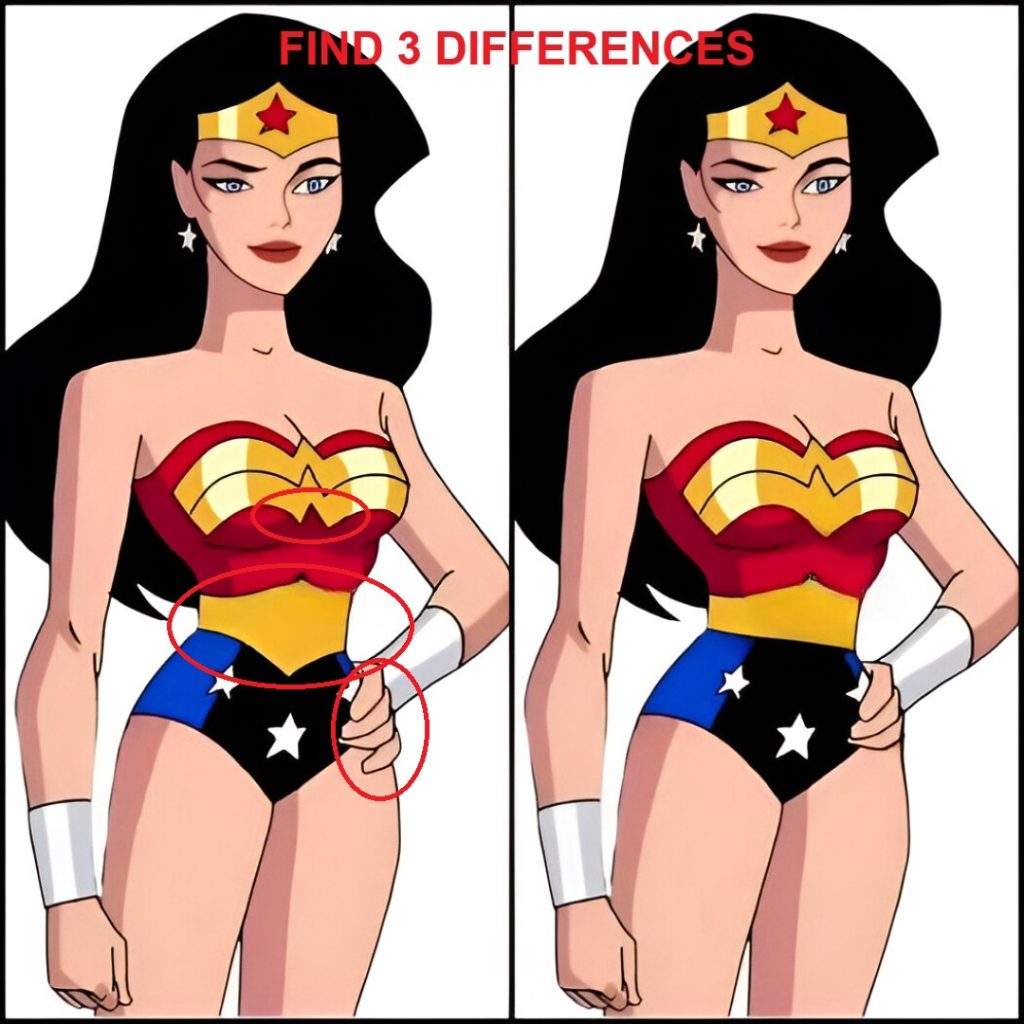
Ready to test your eagle eyes? In the image above, two nearly identical superhero illustrations are placed side by side. Your mission: spot three tiny differences. Sounds easy—until the clock starts ticking and your brain starts filling the gaps for you. Before you scroll any further, take a solid 30 seconds. Where do your eyes go first—the tiara, the golden armor, the belt, the hands? Jot your guesses down. Then come back here and see how you did.

Common Mistakes People Make (And Why Tiny Details Win)
1) Tunnel vision. Most of us start with the face—eyes, star tiara, earrings. They’re bold, centered, and emotionally expressive. But in this puzzle, the differences live below the neckline, so staring at the tiara won’t help.
2) Symmetry bias. Our brains love symmetry. When we see a mirrored pose, we assume matching shapes on both sides. Designers of good puzzles exploit this instinct, hiding edits in near-symmetrical zones like logos, belts, and fingers.
3) Color complacency. When the colors match, we stop checking. But the trick isn’t the hue—it’s the geometry: lines, angles, sharpness, and negative space where two colors meet.
4) “Big first, small later.” Many players look for large changes (missing star, shifted hair) and overlook micro-shifts like a line inside a logo or a tiny button on a belt. In high-quality puzzles, small always beats big.
5) Fatigue from similarity. After 20–30 seconds, your eyes get tired of re-checking the same zones. That’s when you either guess—or miss an obvious clue right at the center.
Ready to learn a method that actually works? Let’s break this puzzle down step by step.
Video : 🐢🧩 Find 3 Differences | Challenge Your Mind 🧩🐢 | Quizonaut Turtle
A Step-by-Step Strategy to Solve It
Step 1: Divide and conquer.
Mentally split the character into zones: head, chest, waist/hip, hands, shorts. Scan each zone left-to-right, top-to-bottom—not randomly.
Step 2: Lock in anchor points.
Pick a few elements you know are consistent (e.g., the star on the tiara, hair silhouette, bracelet shape). Use these as anchors so your eyes don’t drift. This keeps your comparison tight and systematic.
Step 3: Trace the lines, not the colors.
Colors match across both images, so follow lines—the edges of the gold armor, the angles of the emblem, the curves at the waist, and the outlines of the fingers. Differences reveal themselves as small angle changes, added notches, or missing marks.
Now let’s reveal and explain the three differences—exactly where they are and how to see them fast next time.
Difference #1: The Chest Emblem
Zoom your attention to the golden emblem across the upper chest. On one side, the inner linework forms a distinct, continuous “W” shape with clean, sharp angles. On the other side, the central section is shaped differently—the inner zigzag doesn’t match; it’s more like an altered middle notch that breaks the smooth rhythm of the design.

Why it’s tricky: The emblem is bright and busy, which fools your eye into checking only the outline, not the internal geometry. Once you look at the inner lines instead of the outer contour, the mismatch jumps out. Pro tip: trace the middle angle with your fingertip (or just follow it visually). If the “W” doesn’t mirror cleanly, you’ve found it.
✅ Answer 1: Chest symbol.
Difference #2: The Waist Belt at the Taper
Move down to the gold waist section where the red top meets the dark shorts. In one image, the waist piece forms a deeper, longer V-shaped taper, almost like a pointed armor panel extending farther downward. In the other, that gold section is shorter and more like a neat belt, with the center line sitting higher and cleaner across the waist. Some viewers also notice a tiny center detail on one side that’s missing on the other.
Why it’s tricky: The colors across the midsection are identical, and the eye assumes the waist is just a flat divider. But the shape—how far the gold dips and how the middle line behaves—is the giveaway. To spot this quickly, compare the distance from the red seam to the top of the dark shorts on both sides.
✅ Answer 2: The belt/waist cinch area.
Difference #3: The Fingers at the Hip
Finally, examine the hand resting near the hip (the character’s right hand, our left). At a glance, both are fists with the same silver cuff. But look closer at the knuckles and finger segments. One image shows a different count/spacing of visible fingers—either an extra segment is peeking out or the index/middle alignment changes. The contour of the fingers simply doesn’t match across the two versions.
Why it’s tricky: Hands contain lots of small lines that your brain compresses into a single “fist” shape. You think, “Yup, hand—done,” and move on. The fix? Trace each knuckle line and ask, “How many segments are showing? Are the gaps equal?” That micro-check cracks the illusion instantly.
✅ Answer 3: The fingers.
How to Get Faster at Puzzles Like This
Use a grid sweep. Start at the top-left corner and move right, then drop one “row” and move left—like reading lines on a page. It keeps you from skipping zones.
Count elements. Stars, stripes, folds, knuckles—if it can be counted, count it in both images. Numbers don’t lie.
Compare angles. Symmetric designs (logos, belts) reveal differences in angles, not just in shapes. If one angle looks steeper or deeper, you’ve probably found a change.
Blink refresh. Every 20 seconds, blink hard and refocus. It resets your visual fatigue and helps you notice what you missed.
Name the feature. Say out loud: “Chest emblem, middle notch; waist V depth; finger segments.” Naming anchors memory and reduces guesswork.
Share Your Score—and Your Strategy
If you found all three in under 30 seconds, welcome to the top 1%! If you needed more time, that’s perfectly normal—this puzzle is designed to exploit natural biases. Share your time, the order you spotted them, and any tricks you used (gridding, counting, tracing lines). And if you played with friends or family, who spotted what first?
Video : 【Hard Spot the Difference】 Challenging Spot the Difference Brain Game 【Find the Difference #430】
Conclusion: Keep Training Your Eyes—and Your Mind
Spot-the-difference puzzles are more than just a quick distraction; they sharpen focus, detail orientation, and visual memory. Today you trained your brain to slow down, question assumptions, and verify what your eyes think they see. Want to level up? Try more puzzles, set shorter timers, and practice the grid sweep + angle check + element count method. You’ll be amazed how quickly your accuracy improves.
Now it’s your turn: drop your time, your strategy, and your favorite difference in the comments. Share this challenge with a friend and see who joins the 1% club. And if you’re hungry for more, we’ve got plenty of visual brain-teasers waiting to turn you into a detail-detecting machine. Ready for the next one?